Wednesday, January 9, 2019

Konfigurasi untuk keamanan Privacy Whatsapp

Masuk ke menu setting Whatsapp. Click tanda tiga titik dari Whatsapp:


maka akan tampak sebagai berikut, click Settings


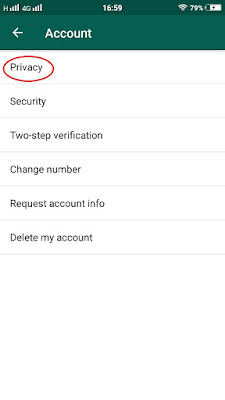
Sesudah itu click Account,


Setelah itu click Privacy


Maka kalian dihadapkan dengang pilihan setting:


Click Last seen, maka akan tampak opsi


Maka kalian harus menentukan, siapa saja yang diijinkan untuk melihat Last seen. Sebaiknya minimum My contacts, sedangkan untuk lebih restricted lagi Nobody. Hal yang sama juga dengan Profile photo dan About. Apakah semua orang boleh lihat profile photo anda dan About?

Selanjutnya adalah setting Status,


Ada tiga pilihan untuk setting privacy dari Status,

  1. My contacts, artinya status yang akan dipost hanya visible semua orang yang ada dalam address book kita
  2. My contacts except ..., artinya status yang dipost hanya visible semua orang yang ada dalam address book kecuali bla bla bla
  3. Only share with ..., pilihan ini kebalikan dari opsi kedua.
Privacy Status ini berlaku per status. Artinya saat kita post satu status yang hanya visible ke contact A, lalu post lagi status yang kedua yang visible My contact, maka status yang pertama tetap visible hanya ke A.

Selain itu perlu juga diperhatikan:


Tuesday, January 8, 2019

Instalasi Ubuntu Server untuk kebutuhan latihan Hacking

Pertama-tama saya akan menyiapkan virtual machine menggunakan Virtual Box Maupun menggunakan VMWare. Sistim Operasi yang saya gunakan adalah Ubuntu 18.04 LTS. Pertama-tama, saya download terlebih dahulu installer dari situs download Ubuntu

Selanjutnya saya boot up Virtual Machine saya:


Pilih Bahasa:


Pilih layout kerboard


Pilih Install Ubuntu


Sekarang kita melakukan konfigurasi network. Saya menggunakan IP Static.


Pilih Edit IPv4


Pilih Manual karena saya mau static IP


Silahkan diisi IP subnet, IP address, gateway, dsb


Abaikan proxy address jika tidak menggunakan proxy


Gunakan mirror address default saja, tekan ENTER


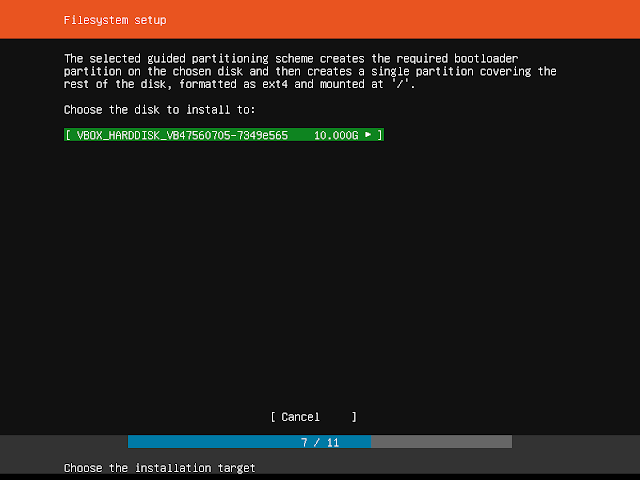
Setting penggunaan seluruh volume harddisk


Tekan ENTER saja


Pilih Done


Pilih Continue


Konfigurasi user account. Isi fullname, hostname, username, dan password


Karena install minimal, tidak usah pilih snaps apa2 langsung pilih Done


Proses installasi mulai berjalan, lama waktu tergantung kecepatan koneksi Internet


Reboot.

Setelah itu login dengan user yang dibuat tadi.
Pertama-tama kita perlu melakukan update:

# sudo apt update
# sudo apt upgrade


Sesudah selesai upgrade sebaiknya reboot terlebih dahulu:

# sudo reboot

Sesudah itu login kembali.

# sudo dpkg-reconfigure dash
Use dash as the default system shell (/bin/sh)? <-- NO
# sudo service apparmor stop
# sudo update-rc.d -f apparmor remove 
# sudo apt-get remove apparmor apparmor-utils

periksa kelengkapan repository;

# sudo nano /etc/apt/sources.list
deb http://archive.ubuntu.com/ubuntu bionic main
deb http://archive.ubuntu.com/ubuntu bionic-security main
deb http://archive.ubuntu.com/ubuntu bionic-updates main
deb http://archive.ubuntu.com/ubuntu bionic main universe
deb http://archive.ubuntu.com/ubuntu bionic-security main universe
deb http://archive.ubuntu.com/ubuntu bionic-updates main universe
pastikan isinya lengkap seperti di atas.

Lakukan update jika ada perubahan:

# sudo apt update

Installasi kebutuhan minimum lainnya:

# sudo apt install ntp ntpdate molly-guard nano ssh openssh-server binutils wget

Install Mariadb:

# sudo apt install mariadb-client mariadb-server
# sudo echo "update mysql.user set plugin = 'mysql_native_password' where user='root';" | mysql -u root
# sudo nano /etc/mysql/mariadb.conf.d/50-server.cnf
[...]
# Instead of skip-networking the default is now to listen only on
# localhost which is more compatible and is not less secure.
#bind-address           = 127.0.0.1
[...]
# sudo mysql_secure_installation
Enter current password for root (enter for none): <-- press enter
Set root password? [Y/n] <-- y
New password: <-- Enter the new MariaDB root password here
Re-enter new password: <-- Repeat the password
Remove anonymous users? [Y/n] <-- y
Disallow root login remotely? [Y/n] <-- y
Reload privilege tables now? [Y/n] <-- y
# sudo nano /etc/mysql/debian.cnf
[......]
# Automatically generated for Debian scripts. DO NOT TOUCH!
[client]
host = localhost
user = root
password = Password root Mariadb
socket = /var/run/mysqld/mysqld.sock
[mysql_upgrade]
host = localhost
user = root
password = Password root Mariadb
socket = /var/run/mysqld/mysqld.sock
basedir = /usr
[......]
 start service Mariadb:

# sudo systemctl enable mariadb
# sudo systemctl start mariadb

Install php dan phpmyadmin:

# sudo apt install apache2 apache2-doc apache2-utils libapache2-mod-php php7.2 php7.2-common php7.2-gd php7.2-mysql php7.2-imap phpmyadmin php7.2-cli php7.2-cgi libapache2-mod-fcgid apache2-suexec-pristine php-pear mcrypt  imagemagick libruby libapache2-mod-python php7.2-curl php7.2-intl php7.2-pspell php7.2-recode php7.2-sqlite3 php7.2-tidy php7.2-xmlrpc php7.2-xsl memcached php-memcache php-imagick php-gettext php7.2-zip php7.2-mbstring php-soap php7.2-soap

Web server to reconfigure automatically: <-- apache2 
Configure database for phpmyadmin with dbconfig-common? <-- Yes
MySQL application password for phpmyadmin: <-- Press enter
#  sudo a2enmod suexec rewrite ssl actions include cgi dav_fs dav auth_digest headers
# sudo systemctl enable apache2
# sudo systemctl start apache2
<-- br="" no="">

Installasi Vulnerable Web Application untuk latihan Hacking

Setelah melakukan instalasi Server Linux CentOS atau Ubuntu maka sekarang kita akan melakukan instalasi Mutillidae, bWAPP dan DVWA.

Login sebagai root

Selanjutnya silahkan download mutillidae link ini
Setelah itu di extract:

# unzip mutillidae-x.x.xx.zip -d /var/www/html
# chown -R apache:apache /var/www/html/mutillidae 

# chmod 777 /var/www/html/mutillidae/test

Create Mariadb database untuk mutillidae: gunakan browser ke http://IPserver/phpmysql login dengan user root Mariadb.


Click Users Tab, lalu click Add User:


User name diisi: mutillidae
Host diisi dengan localhost
Click tombol Generate untuk generate password, harap dicatat password ini untuk diinut di config file mutillidae nanti
Lakukan check mark pada bagian Create database with the same name and grant all privileges lalu tekan tombol Go.

Lakukan edit file config dari mutillidae:

# nano /var/www/html/mutillidae/includes/database-config.php

<?php
define('DB_HOST', 'localhost');
define('DB_USERNAME', 'mutillidae');
define('DB_PASSWORD', 'password yang dibuat');
define('DB_NAME', 'mutillidae');
?>

Lalu di browser http://IPServer/mutillidae:


Click tombol Opt Out:


Lalu click Reset DB:


Click tombol OK
Sekarang mutillidae siap digunakan http://IPaddress/mutillidae: login dengan admin/adminpass

Selanjutnya kita akan install Damn Vulnerable Web Application (DVWA). Pertama-tama kita download dulu dari sini. Setelah itu extract:

# unzip DVWA-master.zip -d /var/www/html/
# cd /var/www/html
# mv DVWA-master/ dvwa/
# chown -R apache:apache dvwa
# nano /etc/php.ini
[.....]
;;;;;;;;;;;;;;;;;;
; Fopen wrappers ;
;;;;;;;;;;;;;;;;;;
; Whether to allow the treatment of URLs (like http:// or ftp://) as files.
; http://php.net/allow-url-fopen
allow_url_fopen = On
; Whether to allow include/require to open URLs (like http:// or ftp://) as fil$
; http://php.net/allow-url-include
allow_url_include = On
; Define the anonymous ftp password (your email address). PHP's default setting
; for this is empty.
[.....]
[...]
;error_reporting = E_ALL & ~E_DEPRECATED
error_reporting = E_ALL & ~E_NOTICE & ~E_DEPRECATED & ~E_STRICT
[...]
; cgi.fix_pathinfo provides *real* PATH_INFO/PATH_TRANSLATED support for CGI.  PHP's
; previous behaviour was to set PATH_TRANSLATED to SCRIPT_FILENAME, and to not grok
; what PATH_INFO is.  For more information on PAppp.tldTH_INFO, see the cgi specs.  Setting
; this to 1 will cause PHP CGI to fix its paths to conform to the spec.  A setting
; of zero causes PHP to behave as before.  Default is 1.  You should fix your scripts
; to use SCRIPT_FILENAME rather than PATH_TRANSLATED.
; http://www.php.net/manual/en/ini.core.php#ini.cgi.fix-pathinfo
cgi.fix_pathinfo=1
[...]
date.timezone = 'Asia/Jakarta'
[...]

Create user dan database di Mariadb . Browse http://IPServer/phpmyadmin


Click Users Tab, lalu click Add User:


User name diisi: dvwa
Host diisi dengan localhost
Click tombol Generate untuk generate password, harap dicatat password ini untuk diinut di config file dvwa nanti
Lakukan check mark pada bagian Create database with the same name and grant all privileges lalu tekan tombol Go.

Lakukan edit file config dari dvwa:

# cp /var/www/html/dvwa/config/config/config.inc.php.dist /var/www/html/dvwa/config/config/config.inc.php
# nano /var/www/html/dvwa/config/config/config.inc.php

[.....]
# Database variables
#   WARNING: The database specified under db_database WILL BE ENTIRELY DELETED during setup.
#   Please use a database dedicated to DVWA.
#
# If you are using MariaDB then you cannot use root, you must use create a dedicated DVWA user.
#   See README.md for more information on this.
$_DVWA = array();
$_DVWA[ 'db_server' ]   = 'localhost';
$_DVWA[ 'db_database' ] = 'dvwa';
$_DVWA[ 'db_user' ]     = 'dvwa';
$_DVWA[ 'db_password' ] = 'password yang dibikin';
[.....]

Sekarang kita siap untuk configure dvwa:
Gunakan browser http://IPServer/dvwa/setup.php:


Click tombol Create/Reset Database:
Sekarang dvwa siap digunakan http://IPserver/dvwa: Login dengan admin/password

Kemudian kita akan melakukan instalasi bWAPP:
Pertama-tama lakukan download dari sini, kemudian diextract:

# unzip bWAPP_latest.zip -d /var/www/html/
# mv /var/www/html/bWAPP_latest/ /var/www/html/bwapp
# chown -R apache:apache /var/www/html/bwapp

Create user dan database di Mariadb . Browse http://IPServer/phpmyadmin


Click Users Tab, lalu click Add User:


User name diisi: bWAPP
Host diisi dengan localhost
Click tombol Generate untuk generate password, harap dicatat password ini untuk diinut di config file bWAPP nanti
Lakukan check mark pada bagian Create database with the same name and grant all privileges lalu tekan tombol Go.

Lakukan edit file config dari bWAPP:

# nano /var/www/html/bWAPP/admin/settings.php

[.....]
// Database connection settings
$db_server = "localhost";
$db_username = "bWAPP";
$db_password = "password yang dibuat";
$db_name = "bWAPP";
[.....]
Lalu gunakan browser: http://IPserver/bWAPP/install.php


 click here:

Maka bWAPP siap digunakan dengan http://IPserver/bWAPP login dengan bee/bug

Installasi CentOS Server untuk kebutuhan latihan hacking

Bagi Professional Cyber Security, melakukan latihan simulasi hacking sangat dibutuhkan untuk mempertajam pengetahuan tentang security breach beserta teknik melakukannya. Berikut saya sampaikan langkah instalasi dan konfigurasi server yang akan sebagai victim dalam melakukan latihan hacking. 

Pertama-tama saya akan menyiapkan virtual machine menggunakan Virtual Box Maupun menggunakan VMWare. Sistim Operasi yang saya gunakan adalah CentOS 7. Pertama-tama, saya download terlebih dahulu installer dari CentOS dari CentOS repository. Pilih ISO minimal yang terbaru.

Selanjutnya, saya melakukan installasi kedalam virtual machine saya. Tampilan pertama setelah boot adalah sebagai berikut:


Saya memilih Install CentOS 7 lalu menekan ENTER

Selanjutnya tampilan akan sibuk seperti ini:


Saya menunggu beberapa saat sampai tampilan menjadi:


Pilih bahasa, dalam hal ini saya memilih bahasa English lalu saya menekan tombol Continue.


selanjutnya pilih timezone:


Saya memilih Jakarta lalu tekan tombol Done, selanjutnya memilih Installation Destination,


Lalu tekan tombol Done, selanjutnya saya memilih Network and Hostname,


Pertama-tama saya tekan tombol switch ON untuk NIC lalu click tombol configure, karena saya mau menjadikan IP static.


Setelah menentukan IP address, gateway, DNS, lalu saya tekan tombol Save, lalu menekan tombol Done. Selanjutnya saya menekan tombol Begin Installation.


Langkah selanjutnya adalah proses instalasi mulai berjalan.


Sementara itu, saya mulai mengisi password untuk root


Kemudian juga saya create user dalam hal ini saya namakan usernya Admin


Jangan lupa untuk melakukan check mark di bagian make this user administrator. Kemudian kita tunggu sampai proses instalasi selesai


Lalu tekan tombol Finish Configuration. Dan kita tunggu proses instalasi tahap akhir selesai dan tekan tombol Reboot


Selanjutnya mesin akan melakukan reboot


Lalu pilih pilihan pertama tekan ENTER


Proses instalasi sistim operasi CentOS selesai


Silahkan login menggunakan user root dengan credential yang dibuat tadi. Setelah masuk, maka yang pertama kali kita lakukan adalah update terhadap sistem operasi. Lakukan itu dengan perintah
# yum -y update


Proses uupdate ini berlangsung beberapa saat lamanya bergantung kecepatan sambungan Internet.


Sesudah selesai lakukan reboot. Kemudian login kembali dengan user root. Lakukan disable firewall, karena ini adalah mesin victim untuk latihan maka kita perlu mematikan firewall:

# systemctl stop firewalld.service
# systemctl disable firewalld.service

Sesudah itu kita melakukan instalasi beberapa tools yang kita butuhkan. Hal ini karena kita melakukan instalasi server CentOS secara minimal, sehingga yang terinstal hanyalah sistem operasi saja.

# yum -y install nano net-tools ntp ntpdate bind-utils ssh openssh-server wget binutils NetworkManager-tui unzip

Selanjutnya kita akan melakukan  setup network:

# nano /etc/hosts
# nano /etc/hostnames


Lakukan adjustment yang dibutuhan dalam konfigurasi dati hosts dan hostname. Jika anda akan mengubah IP address silahkan dilakukan dengan printah:

# nmtui

Selanjutnya yang akan kita matikan adalah SELinux.

# nano /etc/selinux/config

[...
# This file controls the state of SELinux on the system.
# SELINUX= can take one of these three values:
#     enforcing - SELinux security policy is enforced.
#     permissive - SELinux prints warnings instead of enforcing.
#     disabled - No SELinux policy is loaded.
SELINUX=disabled# SELINUXTYPE= can take one of these two values:
#     targeted - Targeted processes are protected,
#     mls - Multi Level Security protection.
SELINUXTYPE=targeted
...]

Pastikan status SELINUX adalah disabled

Lakukan reboot kembali

Sekarang kita akan melakukan installasi Web Server Apache, MariaDb dan PHP (LAMP). Untuk itu kita perlu menambahkan repository EPEL

# rpm --import /etc/pki/rpm-gpg/RPM-GPG-KEY*
# yum -y install epel-release
# yum -y install yum-priorities

Kemudian edit:

# nano /etc/yum.repos.d/epel.repo

Perhatikan dan pastikan ditambahkan priority=10
[epel]
name=Extra Packages for Enterprise Linux 7 - $basearch
#baseurl=http://download.fedoraproject.org/pub/epel/7/$basearch
mirrorlist=https://mirrors.fedoraproject.org/metalink?repo=epel-7&arch=$basearch
failovermethod=priority
enabled=1
priority=10gpgcheck=1
gpgkey=file:///etc/pki/rpm-gpg/RPM-GPG-KEY-EPEL-7
[...]

Sesudah selesai lakukan update sekali lagi:

# yum -y update

Sekarang kita akan install php, mariadb dan http

# yum -y install ntp httpd mod_ssl mariadb-server php php-mysql php-mbstring phpmyadmin

Sesudah selesai kita akan melakukan konfigurasi Mariadb, pertama-tama kita start service dari MariaDb:

# systemctl enable mariadb
# systemctl start mariadb

Kemudian kita menjalankan konfigurasi awal:

# mysql_secure_installation

Set root password? [Y/n] <-- ENTER
New password: <-- yourrootsqlpassword
Re-enter new password: <-- yourrootsqlpassword
Password updated successfully!
Reloading privilege tables..
 ... Success!

By default, a MariaDB installation has an anonymous user, allowing anyone
to log into MariaDB without having to have a user account created for
them. This is intended only for testing, and to make the installation
go a bit smoother. You should remove them before moving into a
production environment.
Remove anonymous users? [Y/n] <-- ENTER
 ... Success!
Normally, root should only be allowed to connect from 'localhost'.  This
ensures that someone cannot guess at the root password from the network.
Disallow root login remotely? [Y/n] N <-- ENTER
 ... Success!
By default, MariaDB comes with a database named 'test' that anyone can
access. This is also intended only for testing, and should be removed
before moving into a production environment.
Remove test database and access to it? [Y/n] <-- ENTER
 - Dropping test database...
 ... Success!
 - Removing privileges on test database...
 ... Success!
Reloading the privilege tables will ensure that all changes made so far
will take effect immediately.
Reload privilege tables now? [Y/n] <-- ENTER
 ... Success!
Cleaning up...
Selanjutnya melakukan konfigurasi phpmyadmin:

# nano /etc/httpd/conf.d/phpMyAdmin.conf
[.....
# phpMyAdmin - Web based MySQL browser written in php
#
# Allows only localhost by default
#
# But allowing phpMyAdmin to anyone other than localhost should be considered
# dangerous unless properly secured by SSL
Alias /phpMyAdmin /usr/share/phpMyAdmin
Alias /phpmyadmin /usr/share/phpMyAdmin
<Directory /usr/share/phpMyAdmin/>
   <IfModule mod_authz_core.c>
     # Apache 2.4
     <RequireAny>
     #  Require ip 127.0.0.1
     #  Require ip ::1
        Require all granted
     </RequireAny>
   </IfModule>
   <IfModule !mod_authz_core.c>
     # Apache 2.2
     Order Deny,Allow
     Deny from All
     Allow from 127.0.0.1
     Allow from ::1
   </IfModule>
</Directory>
...]
# nano /etc/phpMyAdmin/config.inc.php
[...]
/* Authentication type */
$cfg['Servers'][$i]['auth_type'] = 'http';
[...]
# systemctl enable  httpd.service
# systemctl restart  httpd.service

Selanjutnya melakukan instalasi extension php

# yum -y install php-devel php-gd php-imap php-ldap php-odbc php-pear php-xml php-xmlrpc php-pecl-apc php-mcrypt php-mssql php-snmp php-soap php-tidy curl curl-devel perl-libwww-perl ImageMagick libxml2 libxml2-devel mod_fcgid php-cli httpd-devel php-fpm wget

Konfigurasi untuk keamanan Privacy Whatsapp

Masuk ke menu setting Whatsapp. Click tanda tiga titik dari Whatsapp: maka akan tampak sebagai berikut, click Settings Sesudah itu...